Introduction to Arduino Mega
The Arduino Mega is an advanced microcontroller board that forms an integral part of the Arduino ecosystem, which has garnered a diverse community of beginners and experts alike. Introduced by the Arduino platform, it serves as an excellent tool for developing electronic projects that require a significant amount of memory and numerous Input/Output (I/O) pins. Designed to ease the process of programming and circuit design, the Arduino Mega is particularly beneficial for large-scale projects, robotics, and interactive applications.
Arduino itself is an open-source hardware and software platform that promotes creativity and innovation among users by providing user-friendly programming environments. The Arduino Mega, in particular, distinguishes itself from other Arduino boards, such as the Arduino Uno, primarily due to its enhanced specifications. It boasts a robust 256 KB of flash memory for storing code, making it ideal for projects requiring complex computations or various libraries. Additionally, the Mega features 54 digital I/O pins and 16 analog inputs, allowing for extensive connectivity options to multiple sensors, actuators, and other devices.
This unique combination of features positions the Arduino Mega as a powerful solution for users looking to expand their projects beyond the capabilities of simpler boards. As a result, it attracts a wide range of applications in fields like robotics, automation, and IoT (Internet of Things) devices, where advanced functionality is paramount. Whether one is a novice programmer or an experienced engineer, the versatility and performance of the Arduino Mega make it a preferred choice for fulfilling ambitious electronic designs. The thriving community surrounding Arduino further ensures that resources, tutorials, and support are readily accessible, making it easier for users to embark on their projects with confidence.
Key Features and Specifications of Arduino Mega
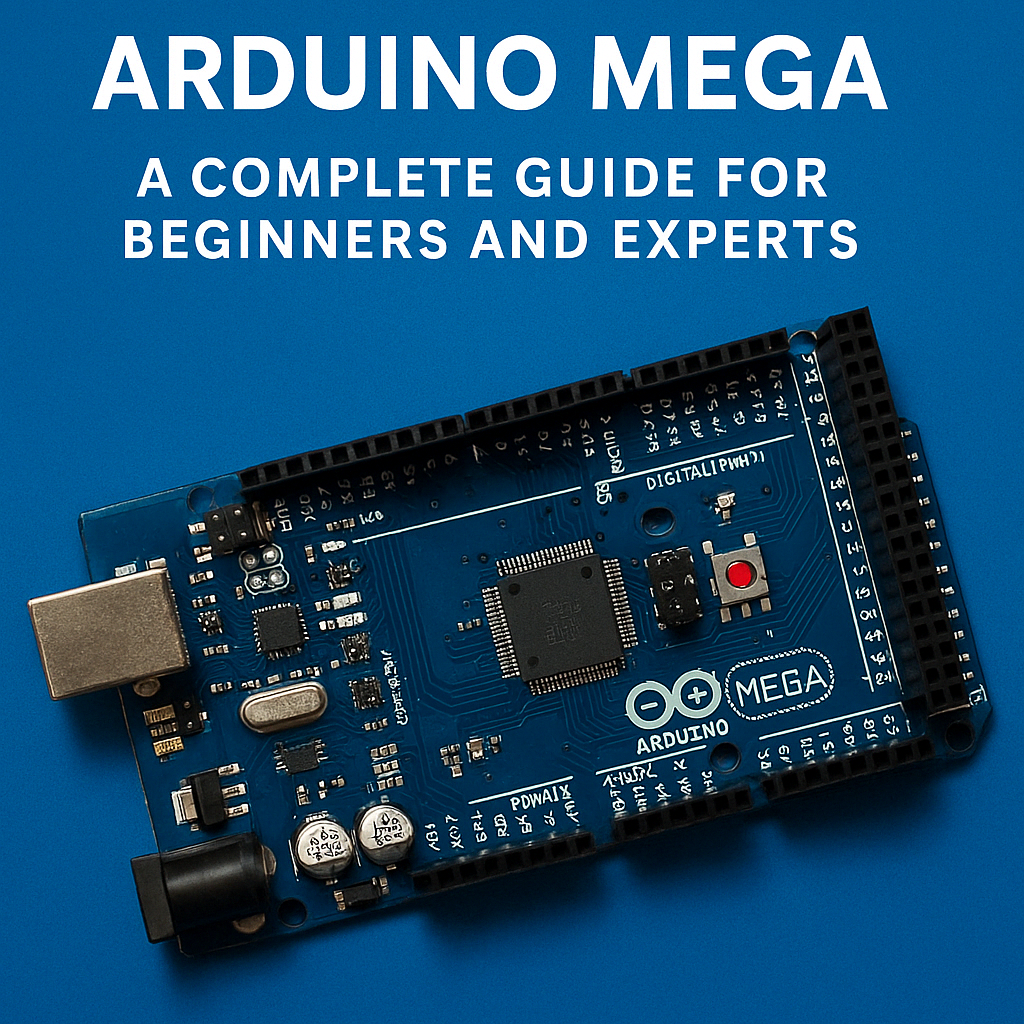
The Arduino Mega is a robust microcontroller board designed to facilitate versatile and expansive projects. It operates utilizing the ATmega2560 microcontroller, which is a significant upgrade compared to many other Arduino models. This microcontroller features a clock speed of 16 MHz, which enables the board to carry out computations and control tasks efficiently. The performance is particularly beneficial for advanced applications, such as robotics or complex sensor integrations.
One of the standout specifications of the Arduino Mega is its extensive number of input and output pins. It comes equipped with a total of 54 digital I/O pins and 16 analog inputs, providing ample options for connecting various sensors, actuators, and other electronic components. This makes the Arduino Mega a top choice for projects requiring multiple connections, allowing for greater experimentation and innovation.
In terms of memory, the Arduino Mega boasts a significant advantage with 256 KB of flash memory for program storage, along with 8 KB of SRAM and 4 KB of EEPROM. This amount of memory supports larger codebases and more complex algorithms, making it suitable for projects that demand substantial resources. The board can be powered through a standard USB connection or an external power source, which is flexible for different project environments. It operates within a voltage range of 7 to 12 volts, thus accommodating various power supply options.
When compared to other Arduino boards, such as the Arduino Uno, the Mega’s superior number of pins and memory make it an undeniable choice for advanced users. While the Uno is more suited for simpler projects with fewer components, the Mega is designed for scalability and sophistication, catering to the needs of both beginners and experts alike. By understanding these key features and specifications, users can better appreciate the Arduino Mega’s vast capabilities.
Setting Up Your Arduino Mega
Setting up your Arduino Mega for the first time is a straightforward process that involves a few essential steps. To begin, you need to download and install the Arduino Integrated Development Environment (IDE), which serves as the primary interface for writing and uploading programs to your Arduino board. You can find the Arduino IDE on the official Arduino website, where it is available for multiple operating systems including Windows, macOS, and Linux. Follow the installation instructions provided for your specific operating system to ensure the software is properly set up on your computer.
Once the Arduino IDE is installed, the next step is to connect your Arduino Mega to your computer using a USB cable. It is important to select the correct board within the Arduino IDE to ensure compatibility. Navigate to the ‘Tools’ menu, then find the ‘Board’ option. From the list, select ‘Arduino Mega or Mega 2560’ to ensure you are programming the right model.
Next, you need to select the correct communication port for your Arduino Mega. Again, under the ‘Tools’ menu, go to ‘Port’ and choose the port corresponding to your connected Arduino board. This completion of these steps sets the stage for successful interaction with your hardware.
Now that your IDE is configured, it is time to write a simple program. A common first program is the classic ‘Hello World’ equivalent, which for Arduino involves blinking the onboard LED. In the IDE, input the following code:
void setup() { pinMode(LED_BUILTIN, OUTPUT);}void loop() { digitalWrite(LED_BUILTIN, HIGH); delay(1000); digitalWrite(LED_BUILTIN, LOW); delay(1000); }After writing the code, click the upload button in the IDE. If everything is set up correctly, the onboard LED should blink on and off every second, confirming that your Arduino Mega is functioning as expected. With this, you have completed the initial setup of your Arduino Mega, paving the way for future projects and exploration.
Understanding Arduino Mega Pinout
The Arduino Mega is a versatile microcontroller board, known for its extensive range of input and output pins. Understanding the pinout of the Arduino Mega is crucial for any project involving this board, as it directly influences how components interact with the microcontroller. The Mega board features a total of 54 digital input/output pins, 16 analog inputs, and various power and communication pins, each serving a unique function.
Digital pins, numbered from 0 to 53, can be configured as either input or output. These pins are used to read high or low signals from devices such as buttons and sensors or to send control signals to LEDs and motors. The digital pins also support Pulse Width Modulation (PWM) on specific pins, allowing for smoother control over devices such as servos and lights.
In addition to the digital pins, the Arduino Mega offers 16 analog input pins, labeled A0 to A15. These pins measure voltage levels in a range from 0 to 5 volts, making them invaluable for reading data from analog sensors like temperature or light sensors. The analog pins can also be utilized for digital input, expanding their utility beyond purely analog applications.
Power and communication pins are also integral to the Arduino Mega’s pinout. The board includes various power pins such as Vin, GND, 5V, and 3.3V, providing the necessary voltage for the board and connected components. Furthermore, communication interfaces like SPI, I2C, and Serial provide essential pathways for data transfer between the Arduino Mega and other devices, including sensors, displays, and additional microcontrollers.
Utilizing the pinout effectively requires understanding both the individual functions of the pins and the overall organization of the board. With careful attention to the pin layout, developers can harness the full potential of the Arduino Mega for a variety of applications, ensuring effective project implementation and design.
Programming the Arduino Mega
The Arduino Mega, a robust microcontroller board, offers extensive capabilities that can be harnessed through programming. The primary language used for programming the Arduino Mega is based on C/C++. The syntax of this programming language is structured to simplify the coding experience, making it accessible for both beginners and experts. Understanding basic syntax is the initial step in creating effective programs. This includes familiarizing oneself with elements such as variables, data types, and operators.
In the Arduino programming environment, variables are defined with specific data types. Common types include int for integers, float for floating-point numbers, and char for characters. For instance, declaring an integer variable could be done as follows: int count = 0;. Furthermore, control structures such as if statements and loops like for and while allow for interactive and dynamic programming, enabling the Arduino Mega to respond to real-time inputs.
Functions play a significant role in organizing code by encapsulating a specific task within a defined method. Users can create custom functions for repeated tasks, enhancing code readability and maintainability. The syntax for defining a function includes specifying the data type the function returns, the function’s name, and parameters it may accept, for example: void setup() {}. This is particularly useful when organizing complex projects that require multiple functionalities.
Lastly, libraries are essential tools that extend the functionality of the Arduino Mega. By leveraging libraries, users can implement advanced concepts like communication protocols, sensor integration, and graphical displays without starting from scratch. Including libraries is straightforward; the command #include <LibraryName.h> is used at the beginning of the sketch. Example libraries include Wire for I2C communication and SPI for efficient data transfer. By applying these programming fundamentals, users can create sophisticated projects and optimize the full potential of the Arduino Mega.
Useful Arduino Mega Projects for Beginners
For those venturing into the world of electronics and programming, the Arduino Mega presents a robust platform that facilitates a variety of beginner-friendly projects. This guide offers a curated list of experiments that newcomers can undertake, dramatically enhancing their understanding and skills in using the Arduino Mega.
One of the simplest and most popular projects is the LED Blinker. This project entails programming the Arduino Mega to turn an LED on and off at specified intervals. All that is required for this project are a basic LED, a resistor, and appropriate jumper wires. By following comprehensive tutorials available online, beginners can familiarize themselves with the basics of coding and circuit assembly.
Another engaging project is the Temperature Sensor, which utilizes a sensor, such as the LM35, to read the ambient temperature. For this project, in addition to the temperature sensor, users will need the Arduino Mega and jumper wires. It is an excellent way for users to learn about analog data reading and how to display results on the serial monitor, making it a practical introduction to environmental monitoring.
A more advanced yet still accessible project is building a Simple Alarm System. This type of project typically involves using a passive infrared (PIR) sensor to detect motion, which triggers a buzzer when movement is detected. The project requires the Arduino Mega, a PIR sensor, and a buzzer. This project effectively demonstrates the integration of various sensors and outputs while emphasizing the importance of security systems.
Lastly, beginners may explore a basic LED Matrix Display project. Utilizing a 8×8 matrix, users can program their Arduino Mega to scroll text or create patterns. This project helps in understanding character encoding and visual output control.
These beginner-friendly projects not only enhance practical skills but also build a solid foundation for future Arduino Mega projects. For detailed tutorials and components required for each project, many resources are available online, making these engaging tasks achievable for novices in electronics.
Advanced Projects and Applications
The Arduino Mega is often the preferred choice for advanced projects and applications due to its extensive capabilities and increased number of input/output (I/O) pins. Its unique features make it ideal for intricate tasks, including robotics, Internet of Things (IoT) devices, data logging, and complex control systems. With 54 digital I/O pins and 16 analog inputs, the Arduino Mega offers a plethora of options for connecting various sensors and actuators, enabling users to develop projects that require a large number of simultaneous inputs and outputs.
One of the most common applications of the Arduino Mega is in the field of robotics. Programmers can utilize its computational power to control robotic arms, drones, or autonomous vehicles. By integrating various sensors such as ultrasonic sensors, accelerometers, and gyroscopes, users can build robots that can navigate complex environments or perform precise movements. Furthermore, employing advanced algorithms like PID control enables smoother and more accurate motion, enhancing the overall efficiency of robotic systems.
The Arduino Mega also serves as a robust platform for developing IoT devices. By leveraging its built-in communication capabilities, users can connect to Wi-Fi or Bluetooth modules, facilitating data exchange with cloud servers or other devices. This enables the creation of smart home applications, automated environmental monitoring systems, or remote-controlled devices, expanding the scope of what can be accomplished in the realm of IoT.
Additionally, the capacity for data logging is another powerful aspect of the Arduino Mega. By incorporating SD card readers and sensors, users can collect and store data for further analysis. This is particularly beneficial for scientific experiments or environmental studies where reliable data monitoring is critical. Lastly, the flexibility to engage with various control systems allows developers to create intricate designs, ranging from simple lighting solutions to complex industrial automation systems, showcasing the true power of the Arduino Mega in advanced applications.
Common Issues and Troubleshooting Tips
The Arduino Mega, while a powerful tool for electronics projects, can present several common issues that users may face. Addressing these challenges effectively requires systematic troubleshooting approaches. One of the primary concerns is power-related problems. Ensure that the board is receiving adequate voltage; the Arduino Mega operates best within the 7-12 volts range. If you encounter unexpected resets or unresponsiveness, check the power supply and USB connection. A faulty power supply can lead to erratic behavior and hinder the functionality of your projects.
Connectivity issues also arise frequently when using the Arduino Mega. The board features multiple pins for connecting various sensors and modules, but problems can occur if incorrect wiring is employed or if loose connections disrupt the flow of data. Always verify that all connections are secure and that you are using the correct pin numbers specified in your code. Additionally, utilizing a breadboard can facilitate reliable connections, reducing the likelihood of issues stemming from inconsistent wiring.
Programming errors represent another common hurdle for users, particularly for those new to coding. When uploading sketches to the Arduino Mega, users may encounter compilation errors or upload failures. Checking the code for syntax errors, ensuring you have selected the correct board type in the IDE, and confirming the correct COM port are fundamental steps in diagnosing the issue. Be mindful of using libraries that may not be compatible with the Mega, as this can also generate errors during the upload process.
In addressing these typical challenges, a systematic approach to troubleshooting will help users swiftly pinpoint the source of their problems. By following these tips, both beginners and experienced users can enhance their interactions with the Arduino Mega, making their project experience far more rewarding.
Resources and Community Support
The Arduino platform is bolstered by a robust ecosystem of resources and community support, making it an excellent choice for both beginners and experts alike. One of the primary sources of information is the official Arduino website, which hosts a vast library of documentation, including detailed guides, tutorials, and project ideas. This extensive resource is particularly valuable for newcomers looking to understand the fundamentals of Arduino programming and electronics.
In addition to official documentation, there are numerous online forums dedicated to Arduino enthusiasts. Websites such as Arduino Forum and Stack Overflow offer platforms where individuals can ask questions, share knowledge, and troubleshoot problems with the support of a vibrant community. These forums serve as a rich repository for discussions on various projects, helping users find solutions to specific challenges they encounter during their design and implementation processes.
Social media platforms and online communities also play a significant role in promoting collaboration among Arduino users. For instance, Facebook groups, Reddit threads, and Instagram pages often feature project showcases, tips and tricks, and insights into the latest developments in the Arduino ecosystem. Engaging with these platforms can inspire creativity, allowing users to explore new applications and innovative uses for their Arduino boards.
Moreover, many local and online Maker spaces facilitate workshops and meetups, bringing like-minded individuals together to learn and collaborate on projects. These gatherings provide opportunities for hands-on practice and the sharing of experiences, further enriching the learning experience. Participating in these communities not only enhances technical skills but also fosters a sense of belonging within the global maker culture.
Overall, leveraging these diverse resources and engaging with the Arduino community can significantly enhance one’s learning journey, provide support during challenges, and inspire continuous innovation in the realm of electronics and programming.
*Is the Mega capable to run a 4 axes router with dm542 drivers and nema 24 motors? I am interested in running x, y1, y2 & z . Is the Mega going to work with Win 11?