The Arduino Nano is one of the smallest, lowest-cost, and easiest-to-start-with microcontrollers in the Arduino range. While it’s small, it includes enough features to drive a great range of DIY and IoT applications
Whether you’re a hobbyist or a student, the Arduino Nano provides an excellent entry point to the world of embedded systems. In this tutorial, we will guide you through everything from pinouts to cool project ideas.
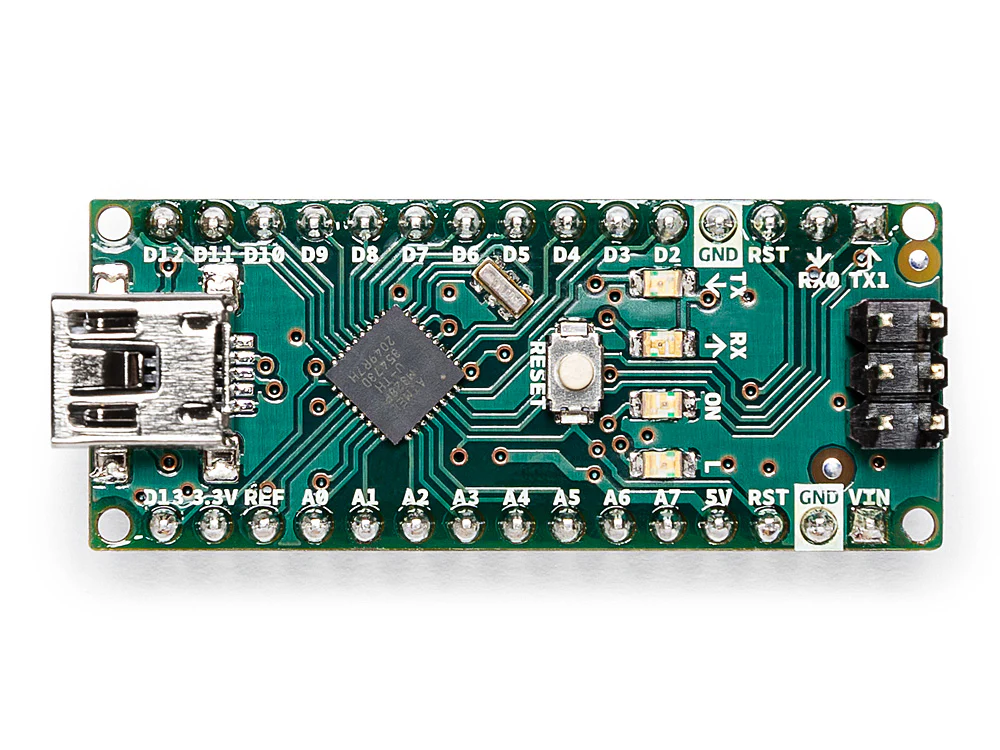
ARDUINO NANO
ARDUINO NANO
Overview of Arduino Nano
The Arduino Nano is a small breadboard-friendly board based on the ATmega328P microcontroller. Unlike the larger Arduino Uno, the Nano is compact and suitable for tight spaces. It offers the same functionality with just a different layout.
The Arduino Nano is also highly regarded for its versatility in handling various projects, making it a preferred choice for electronics enthusiasts. It supports a wide array of libraries and has a vibrant community that contributes to its ongoing development. This microcontroller is particularly useful for students and hobbyists who want to experiment with coding and electronics without breaking the bank.
Key Features:
These features make the Arduino Nano ideal for compact projects such as wearables, small robots, or any DIY projects where space is a constraint. Moreover, the Nano’s small footprint does not mean it compromises on performance, making it a great choice for beginners and experts alike.
Operating Voltage: 5V
Input Voltage: 7-12V
Digital I/O Pins: 14 (of which 6 provide PWM output)
Analog Input Pins: 8
Clock Speed: 16 MHz
Flash Memory: 32 KB
Understanding the pinout is crucial for successfully connecting components and sensors to the Arduino Nano. Each pin on the Arduino Nano has specific functions, and knowing these can significantly enhance your project execution. Let’s explore each pin type in detail to understand their roles better.
Arduino Nano Pinout Diagram
Knowing the Arduino Nano pinout is essential to successful prototyping. Here is a summary of the most widely used pins:
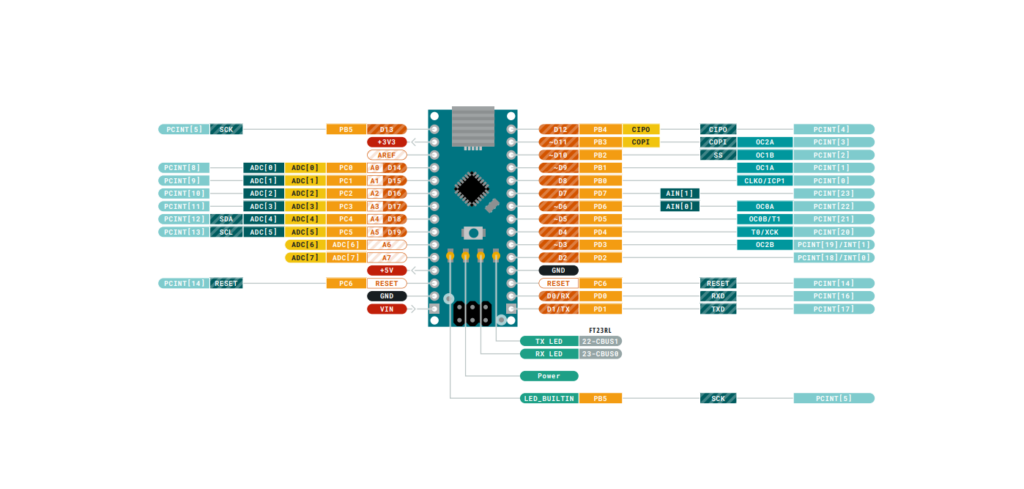
Digital Pins (D0 to D13)
Digital pins can be used for both input and output purposes. For instance, if you want to turn on an LED, you can connect it to one of these pins. The pins D3, D5, D6, D9, D10, and D11 are capable of handling PWM (Pulse Width Modulation), which allows for adjusting the brightness of an LED or the speed of a motor. PWM is particularly useful for projects requiring variable power control.
Power pins are crucial for supplying the correct voltage to your components. The VIN pin allows external power to be supplied to the board when it’s not connected to a USB power source. The 5V and 3.3V pins provide regulated power outputs for connecting peripherals, ensuring safe voltage levels for all your components.
Analog Pins (A0 to A7)
The analog pins are essential for reading varying voltage levels. They can be used to connect sensors that output an analog signal. For example, a temperature sensor will provide different voltage levels based on the temperature detected. The Arduino will convert this analog signal into a digital value using its internal Analog-to-Digital Converter (ADC), allowing you to process the data effectively.
Analog signal reading and converting to digital value through the internal ADC.
Communication pins enable your Arduino Nano to interact with other devices. For instance, the RX and TX pins facilitate serial communication, allowing for data transfer between the Arduino and other serial devices, such as GPS modules or Bluetooth modules. Understanding how to utilize these pins can expand the functionality of your projects significantly.
Power Pins
VIN – Power input
5V – Output regulated power supply
3.3V – Low-voltage devices
GND – Ground
In this project, you can create a touch-based LED controller using a TTP223 touch sensor. The simplicity of this project allows beginners to understand the basics of connecting sensors to the Nano and controlling outputs based on user input.
Communication Pins
Building a temperature monitoring system with a DHT11 sensor not only teaches you how to read sensor data but also how to display it on an OLED screen. This project’s complexity can be gradually increased by integrating additional features, like logging temperature data.
TX (D1) & RX (D0) – Serial Communication
Creating an obstacle avoidance robot introduces motor control and sensor integration. By incorporating ultrasonic sensors, you can program the robot to detect and navigate around obstacles autonomously, providing hands-on experience with robotics.
I2C – A4 (SDA) and A5 (SCL)
This project allows users to operate various home appliances using an IR remote and an Arduino Nano. It teaches practical applications of remote controls and infrared communication, something that can be seen in many household devices.
SPI – D10 (SS), D11 (MOSI), D12 (MISO), D13 (SCK)
Using an LM35 sensor, you can measure and display temperature readings on an LCD. This digital thermometer project can be expanded to include features such as data logging or even sending readings to a web server for remote monitoring.
Top 5 Arduino Nano Projects for Beginners
The Arduino Nano has numerous benefits that make it a popular choice among makers and educators. Its compact size is not only an advantage for portable projects but also lends itself well to learning environments where space may be limited. Additionally, the lower cost compared to other Arduino boards allows students to experiment without significant financial risk.
Its compatibility with a range of shields and modules enhances its utility, enabling users to expand their projects’ capabilities easily. Furthermore, the Arduino community is a vast resource for troubleshooting, project ideas, and collaborations, making it easier for beginners to find help when needed.
Arduino Nano projects can be incredibly diverse, allowing for both educational purposes and practical applications. Here are five engaging projects that beginners can undertake to familiarize themselves with the capabilities of the Arduino Nano:
1. Touch-Based LED Controller
Make a touch-sensitive light switch with a TTP223 touch sensor.
When it comes to purchasing an Arduino Nano, it is advisable to consider both original and clone options. While original boards typically offer better quality and support, clones can be a budget-friendly alternative. Always check for compatibility and reviews before purchasing to ensure you get the best option for your project needs.
With the growth of the Internet of Things (IoT), the Arduino Nano is increasingly being utilized in smart home applications and remote monitoring systems. This opens up endless possibilities for innovation and creativity in everyday projects.
2. Temperature Monitoring System
Use a DHT11 sensor to sense temperature and humidity and display on an OLED screen.
3. Obstacle Avoidance Robot
Pair the Nano with ultrasonic sensors and motors to construct a simple obstacle-avoiding robot.
4. Home Automation using IR Remote
Operate home appliances with an IR remote and Arduino Nano.
5. Digital Thermometer
Measure and show temperature with the LM35 sensor.
Benefits of Using Arduino Nano
1. Compact and small – perfect for wearable or portable projects
2. Breadboard-friendly
3. Reduced power consumption
4. Inexpensive substitute for Arduino Uno
5. Compatible with a lot of shields and modules
Where to Purchase Arduino Nano?
You can purchase original or clone Arduino Nano boards from:
Arduino.cc
Amazon
Robu.in (India)
Local electronics stores
Last Words
Arduino Nano is an incredible microcontroller in a tiny package. It’s an excellent beginning for people stepping into electronics. If you need to build automation, robots, or wearables, Nano has got you covered.
Be sure to visit our blog, store, and community collaboration page on Tinkerzy.com to find more guides and share your projects.