🧠 Project Overview
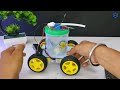
This Automatic Fire Fighting Robot is a fantastic school-level science project that detects fire using an IR photodiode sensor and automatically moves toward the fire to extinguish it using a fan or LED-based indicator system.
What makes it even more interesting? It works without any microcontroller like Arduino! It uses basic electronics components to build a fire-responsive bot using just sensors, transistors, and relays.
Perfect for Inspire Award projects, exhibitions, and students wanting to learn electronics in a practical way.
📦 Components Required
| Component | Buy Link |
|---|---|
| IR Photodiode (Receiver) | Buy Here |
| BC547 NPN Transistor | Buy Here |
| Resistors (220Ω, 1kΩ, 10kΩ) | Buy Here |
| LED (Any color) | Buy Here |
| 1N4007 Diode | Buy Here |
| 5V Relay | Buy Here |
| 3.7V Li-ion Battery (x2) | Buy Here |
| Gear Motors (x4) | Buy Here |
| Power Switch | Local electronics store |
| Wires, Battery Holder, Chassis, Glue, etc. | DIY toolkit |
🛠️ How to Make the Automatic Fire Fighting Robot
🔹 Step 1: Prepare the Chassis
Fix all four gear motors to the base (cardboard, acrylic, or plastic chassis).
Attach wheels to the motor shafts.
Connect the motors in parallel pairs (left & right) to allow forward/backward motion.
🔹 Step 2: IR Sensor Setup
Connect the IR photodiode in a voltage divider configuration with a 10kΩ resistor.
The sensor will detect infrared light emitted by flames.
Important: It only works well indoors, as sunlight contains IR light that may interfere.
🔹 Step 3: Build the Control Circuit
Use the BC547 transistor as a switch to control the 5V relay.
When the IR sensor detects fire, it sends a signal to the base of the transistor.
The transistor then powers the relay module, which can turn on:
A fan motor (to simulate extinguishing)
OR the car motors (to move the robot toward the fire)
🔹 Step 4: Motor & Relay Connection
Connect the relay’s output to control power to the gear motors.
When activated, the motors start moving toward the detected flame.
Optionally, add a fan or a bright LED as a visual extinguisher.
🔹 Step 5: Power Setup
Connect two 3.7V Li-ion batteries in series (~7.4V).
Use a switch to control the power.
Make sure all grounds are common across components.
⚠️ Important Notes
Works best indoors to avoid false IR triggers from sunlight.
Make sure transistor and relay values are accurate.
Ensure motor load doesn’t exceed relay rating (use small DC motors).
🧩 How It Works
The IR sensor detects infrared radiation (heat) from fire.
When triggered, it sends a small signal to the BC547 transistor, acting like a gate.
The transistor powers the relay, which switches on the motor/fan system.
The robot automatically moves toward the fire or turns on an extinguisher simulation.
🧠 Applications
School-level science exhibitions
Inspire Award competitions
Fire-detection and automation prototypes
Learning real-world transistor and relay logic
🔗 Related DIY Projects
🏷️ Tags:
Fire Fighting Robot, No Arduino Project, Relay Based Robot, IR Flame Detection, DIY Science Project, Inspire Award, Fire Extinguisher Robot, PendTech, School Exhibition Robot
✅ Final Thoughts
This Automatic Fire Fighting Robot Without Arduino is proof that you don’t always need microcontrollers for smart automation. A clever use of IR sensors, transistors, and relays can create intelligent robots even with simple electronics knowledge.