Things Used in This Project
| Category | Item |
|---|---|
| Hardware Components | Seeed Studio XIAO SAMD21 (Pre-Soldered) – Seeeduino XIAO ×1 |
| Software & Online Tools | Autodesk Fusion (Fusion 360) |
| Arduino IDE | |
| Fabrication Tools | 3D Printer (Generic) |
PCB/PCBA Service (Used: Seeed Studio Fusion) |
Story
Hello everyone, and welcome back!
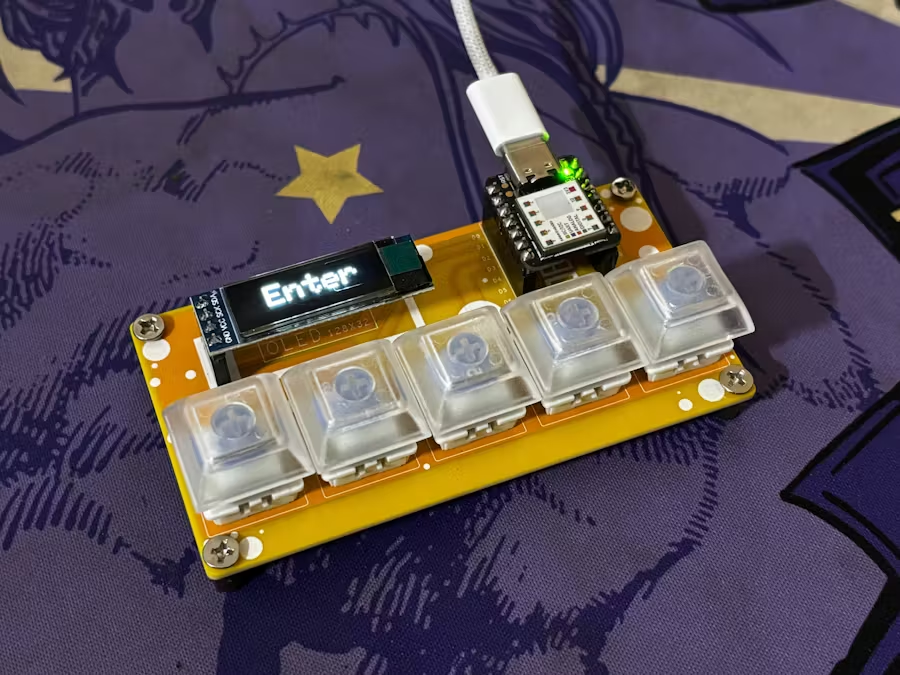
This is PastePal V2, the updated version of my earlier PastePal project—a minimalist macropad originally built with two buttons and a small OLED display. In the first iteration, one button was assigned to “copy” and the other to “paste.”
In this upgraded version, we’ve expanded the functionality by adding five mechanical switches, which can now trigger various commands such as opening applications, executing shortcuts, typing predefined text, or any custom task you assign.
Currently, the five buttons are mapped to:
Enter, Scroll Up, Scroll Down, Copy, and Paste.
However, the setup is entirely customizable—you can reprogram the buttons easily in the main code to suit your needs.
At the core of the device is the XIAO SAMD21 microcontroller, which supports HID (Human Interface Device) functionality. This allows the board to behave like a keyboard or mouse when connected to a computer—perfect for use as a macropad.
In Version 1, tactile SMD buttons were used, which worked fine but lacked the tactile feedback that improves usability. In this version, we’ve upgraded to Blue Mechanical Switches, offering a satisfying click and resistance when pressed—making the experience more responsive and enjoyable.
The macropad displays the current command being executed on a 128×32 SSD1306 OLED screen, making the interface more intuitive.
This guide will walk you through the full build process of PastePal V2.
Materials Required
| Component | Description |
|---|---|
| Custom PCB | Designed for this project |
| XIAO SAMD21 Microcontroller | Core controller with HID support |
| Blue Mechanical Switches | Tactile switches for user input |
| Keycaps | Fitted over mechanical switches |
| SSD1306 OLED Display (128×32) | For displaying current actions |
| Female Header Pins | Used for XIAO and OLED connectivity |
| M2.5 Bolts | For securing the case and components |
| M2.5 PCB Standoffs | To mount the PCB and add spacing |
Design

3D Modeling
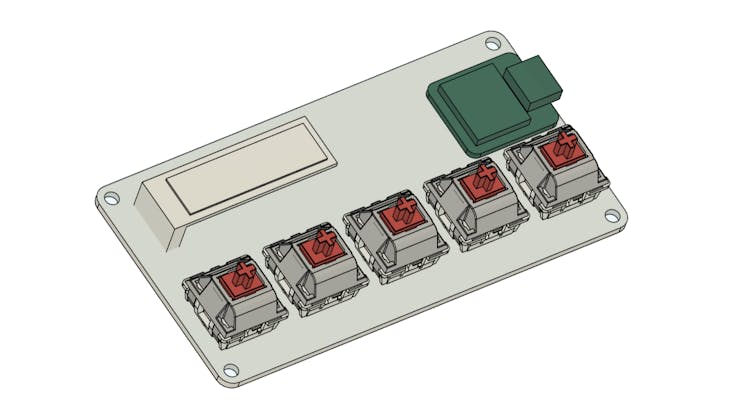
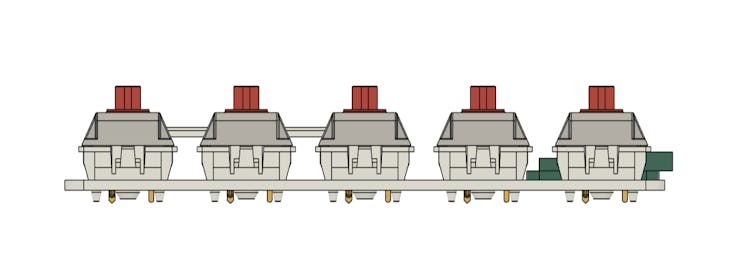
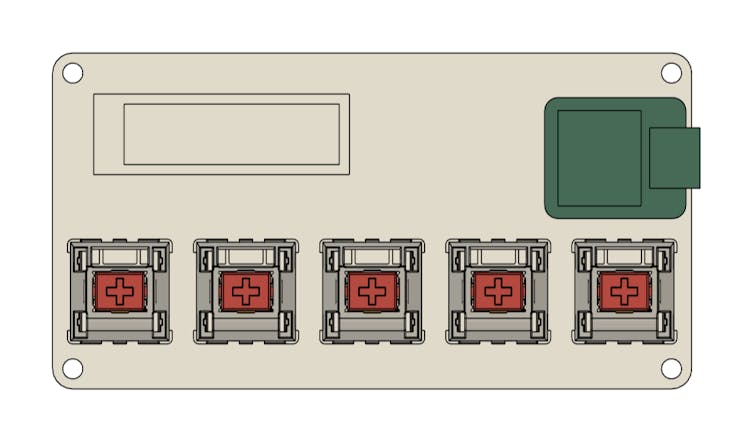
To kick off the project, we started by preparing a 3D model using Fusion 360. We imported models for the SSD1306 OLED display, XIAO microcontroller, and mechanical switches into the workspace. With all parts ready, we laid out the components to design the base structure of the macropad.
The OLED screen was positioned in the upper-left corner of the board, while the XIAO microcontroller was placed in the upper-right corner. The five mechanical switches were arranged in a single row along the bottom edge of the board to allow easy access.
To support the board, we added four 3mm mounting holes, one near each corner, allowing the use of PCB standoffs for proper elevation and stability during assembly.
PCB Design

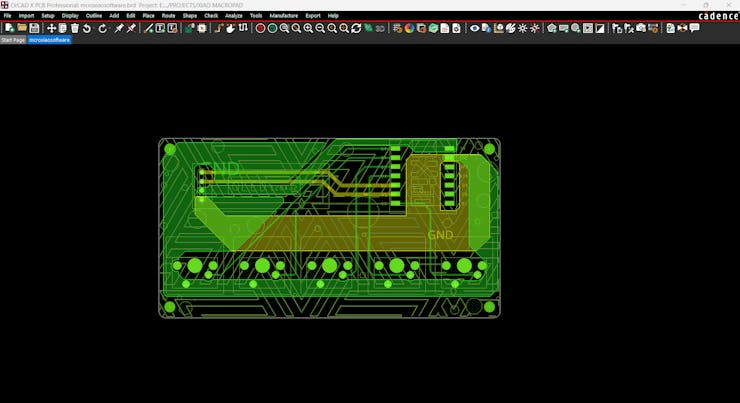
With the mechanical layout finalized, we moved on to designing the PCB schematic. The circuit consists of:
Five mechanical switches, each connected to the XIAO microcontroller.
An SSD1306 OLED display, used to show active command states.
Wiring Details:
Each switch’s normally open (NO) terminal is connected to GND, while the normally closed (NC) terminals are connected to the following pins on the XIAO: D0, D1, D2, D3, and D6.
The OLED’s SDA line connects to D4, and SCL to D5 on the XIAO.
VCC on the OLED is connected to the XIAO’s 5V, and GND goes to GND.
The final PCB layout was directly influenced by the 3D model’s dimensions and component placements. We also included the four mounting holes (3mm) on the PCB, matching the 3D layout, to allow proper use of standoffs during assembly.
PCB Assembly Process
Assembling the board is straightforward. We began by placing all mechanical switches into their designated positions on the PCB, followed by inserting the female header pins for both the XIAO microcontroller and the OLED display.
Once all components were aligned properly, we flipped the board and soldered each mechanical switch and header pin from the underside.
After soldering, the XIAO SAMD21 and the OLED screen were plugged into their respective headers, completing the electronic side of the assembly.
Final Assembly
With the electronics in place, we moved on to the final touches.
We inserted four M2.5 PCB standoffs into the pre-drilled mounting holes at each corner of the board and secured them using M2.5 bolts and a screwdriver.
Finally, we placed keycaps onto the five mechanical switches to finish the build. At this point, the PastePal V2 macropad was fully assembled and ready for programming and use.
CODE
Here’s the sketch that we used in this project and its a simple one.
#include <Wire.h>
#include <Adafruit_GFX.h>
#include <Adafruit_SSD1306.h>
#include <Keyboard.h>
#define SCREEN_WIDTH 128
#define SCREEN_HEIGHT 32
#define OLED_RESET    -1
Adafruit_SSD1306 display(SCREEN_WIDTH, SCREEN_HEIGHT, &Wire, OLED_RESET);
const int buttonCopyPin = 0; // Pin for the copy button
const int buttonPastePin = 1; // Pin for the paste button
const int buttonScrollUpPin = 2; // Pin for the page scroll up button
const int buttonScrollDownPin = 3; // Pin for the page scroll down button
const int buttonEnterPin = 6; // Pin for the enter button
void setup() {
// Initialize the OLED display
if(!display.begin(SSD1306_SWITCHCAPVCC, 0x3C)) {
Serial.println(F("SSD1306 allocation failed"));
for(;;);
}
display.display();
delay(2000);
display.clearDisplay();
// Initialize the buttons
pinMode(buttonCopyPin, INPUT_PULLUP);
pinMode(buttonPastePin, INPUT_PULLUP);
pinMode(buttonScrollUpPin, INPUT_PULLUP);
pinMode(buttonScrollDownPin, INPUT_PULLUP);
pinMode(buttonEnterPin, INPUT_PULLUP);
// Initialize the Keyboard library
Keyboard.begin();
}
void loop() {
if (digitalRead(buttonCopyPin) == LOW) {
display.clearDisplay();
display.setTextSize(3);
display.setTextColor(SSD1306_WHITE);
display.setCursor(20, 5);
display.print("Copy");
display.display();
Keyboard.press(KEY_LEFT_CTRL);
Keyboard.press('c');
delay(100);
Keyboard.releaseAll();
delay(500); // Debounce delay
}
if (digitalRead(buttonPastePin) == LOW) {
display.clearDisplay();
display.setTextSize(3);
display.setTextColor(SSD1306_WHITE);
display.setCursor(20, 5);
display.print("Paste");
display.display();
Keyboard.press(KEY_LEFT_CTRL);
Keyboard.press('v');
delay(100);
Keyboard.releaseAll();
delay(500); // Debounce delay
}
if (digitalRead(buttonScrollUpPin) == LOW) {
display.clearDisplay();
display.setTextSize(2);
display.setTextColor(SSD1306_WHITE);
display.setCursor(10, 5);
display.print("Scroll UP");
display.display();
Keyboard.press(KEY_PAGE_UP);
delay(100);
Keyboard.releaseAll();
delay(500); // Debounce delay
}
if (digitalRead(buttonScrollDownPin) == LOW) {
display.clearDisplay();
display.setTextSize(2);
display.setTextColor(SSD1306_WHITE);
display.setCursor(10, 5); // Adjusted cursor position
display.print("Scroll Down");
display.display();
Keyboard.press(KEY_PAGE_DOWN);
delay(100);
Keyboard.releaseAll();
delay(500); // Debounce delay
}
if (digitalRead(buttonEnterPin) == LOW) {
display.clearDisplay();
display.setTextSize(3);
display.setTextColor(SSD1306_WHITE);
display.setCursor(25, 5);
display.print("Enter");
display.display();
Keyboard.press(KEY_RETURN);
delay(100);
Keyboard.releaseAll();
delay(500); // Debounce delay
}
}

In this sketch, we are using two main libraries: one for running the OLED screen and the other to execute keyboard functions.
#include <Wire.h>
#include <Adafruit_GFX.h>
#include <Adafruit_SSD1306.h>
#include <Keyboard.h>
Make sure to download and install these above libraries before using this sketch.
This sketch makes our XIAO act like a keyboard when specific buttons are pressed, giving feedback on an OLED display. Each button press simulates a keyboard shortcut or key press, and the OLED display updates to reflect the action.
RESULTS
The end result of this small build is a working Macropad that can execute the Copy paste command, scroll a webpage (any app that supports Page up and down), and enter commands.
We can use Copy and Paste macros for typing and even cad work.
The scrolling feature is especially useful while browsing YouTube or other websites that demand frequent scrolling.
Leave a comment if you need any help regarding this project. This is it for today, folks.
You guys can check them out if you need great PCB and stencil service for less cost and great quality.
And I’ll be back with a new project pretty soon!